You may not realize it, but you use a lot of Internet connections every day: your home network, your phone, and even hotspots and other devices. The downside is that you can usually only use one at a time. Imagine if you could combine them all into one big network that delivers faster downloads, smoother streaming, and sharper video calls?
Today's article will show you how to combine two or more Internet networks into one main network. By doing so, you'll split your download speed across two or more available Internet connections so that your overall browsing speed isn't affected by downloading large files or streaming continuously.

Why Do You Need to Do This?
In most cases, a constant Internet connection is enough for everyday needs. If your Internet connection is stable and has good bandwidth, you really don't need to do anything else. But what about other situations, like when you want to download files in the background while playing your favorite multiplayer game and a friend is streaming Netflix in the next room? In today's high-tech world, you can do all of that at the same time without affecting your overall speed.
In other cases, stability is what you need most, not necessarily speed. Maybe you're traveling and have a connection that isn't stable enough to get everything done. If you've ever had to wait for a website to load on hotel Wi-Fi, watch YouTube, attend an event, and upload photos using 4G because hundreds of other people are trying to do the same thing, you know how important it is to have a stable Internet connection.
Methods to combine two networks to increase speed
Method 1: On Windows
1. Buy a USB Wi-Fi adapter. You'll need at least one of these for your computer, so it can recognize more than one wireless network.
2. Attach the USB Wi-Fi adapter to your computer. Plug the USB Wi-Fi adapter into one of the USB ports on your computer.
If prompted, follow any on-screen instructions to set up the adapter.
3. Connect to your second wireless network. Click the “Wi-Fi” icon in the lower right of the screen, click the drop-down box at the top of the pop-up menu, click Wi-Fi 2, and then connect to the second wireless network.
4. Open Start. Click the Windows logo in the lower left corner of the screen.
5. Open Settings. Click the gear icon in the lower left of the Start menu.
6. Click Network & Internet. This globe icon is in the Settings window.
7. Click Change adapter options. It’s in the Change your network settings section in the middle of the page. This will open a Control Panel window with all your Internet connections.
8. Double-click your primary Wi-Fi connection. This should be the network you were connected to before plugging in your wireless Internet adapter. A pop-up will open.
9. Change the connection properties. To enable two wireless connections at once, you'll need to change the properties of both connections, starting with the primary connection:
- Click Properties.
- Select Internet Protocol Version 4 (TCP/IPv4).
- Click Properties.
- Click Advanced.
- Uncheck the Automatic metric box.
- Enter 15 in the "Interface metric" text box.
- Click OK on the top two windows.
- Click Close on the bottom two windows.
10. Change the properties of the second connection. You'll do the same thing you did for the first connection. Note the 15 in the Interface metric text box here.
11. Restart your computer. Click Start, select Power, and click Restart. When your computer finishes restarting, it will use both connections to divide the bandwidth for your computer.
Method 2: On a Mac
1. Make sure you have two Ethernet ports. To group two Internet networks on your Mac without using a special router, you'll need to use an Ethernet connection for each of the routers. This means your Mac must have two Ethernet ports or be able to accommodate an Ethernet adapter:
If you have one Ethernet port and at least one USB-C (Thunderbolt 3) port, you can buy Apple's USB-C Ethernet adapter to plug into it as a second Ethernet port.
If you don't have an Ethernet port and at least two USB-C (Thunderbolt 3) ports, you can buy two Apple USB-C Ethernet adapters to create two Ethernet ports.
If you only have one USB-C (Thunderbolt 3) port and no Ethernet ports, you can't group two Internet networks over Ethernet. Try using a load-balancing router instead.
Since your Mac can only group two networks together if they're both using 802.3ad-compliant connections, you can't use a USB 3.0 to Ethernet adapter.
2. Connect both routers to your Mac. Use an Ethernet cable for each to connect the two routers: Plug one end of the cable into the "LAN" (or similar) port on the back of each router, then plug the other end into your Mac's Ethernet port. You'll need to connect the Ethernet adapter(s) to your Mac first if you don't have multiple Ethernet ports.
3. Open the Apple menu. Click the Apple icon in the upper-left corner of your screen. A drop-down menu will appear.
4. Click System Preferences. It's near the top of the drop-down menu. Doing so will open the System Preferences window.
5. Click Network. You'll find this globe-shaped icon in the System Preferences window. Clicking it will open the Network window.
6. Click the gear-shaped Action icon. It’s in the lower left of the window. A pop-up menu will appear.
7. Click Manage Virtual Interfaces. This option is in the “Action” pop-up menu. A new window will open.
8. Click + in the lower left of the new window. A drop-down menu will appear.
9. Click New Link Aggregate. This option is in the drop-down menu.
10. Select the Ethernet port. Click the checkbox to the left of each Ethernet connection.
11. Enter a name. Type a name for the new connection in the text box at the top of the window.
12. Click Create, then click Apply. This will create both the combined Internet connection and the connection to it. Your Mac will now automatically divide things like download and streaming speeds between the two connections.
Method 3: Using a Load Balancing Router
1. Buy a load balancing router. A load balancing router combines all of your Internet connections into one larger network. You can connect multiple modems with different wireless networks to your load balancing router to handle all of your modem connections.
A two-connection load balancing router will cost between $40 and $90.
2. Connect any modems to the router. If you have two or more wireless networks broadcasting from separate modems, you can connect them to your load balancing router by plugging one end of an Ethernet cable into the square "Internet" port on your chosen modem and then connecting the other end to another square port on the back of the router.

3. Open the router's configuration page on your computer. You'll do this by entering the IP address for your regular network, which can be found in your connection settings.
If connecting to the IP address in your computer's connection settings doesn't take you to your router's configuration page, check the Basic Setup section of your router's manual for the correct address.

4. Click Advanced. You'll usually find this tab on the left side of your router's admin page.
While most load balancing routers have similar admin pages, you may find slightly different options in some locations depending on the manufacturer.

5. Click Load Balance, which is usually on the left side of the page.

6. Uncheck the Enable Application Optimized Routing box. You'll most likely find this near the top of the page.

7. Uncheck the Enable Bandwidth Based Balance Routing box. Unchecking this box and the Enable Application Optimized Routing box will allow your load balancing router to group connected Wi-Fi networks into a single connection.
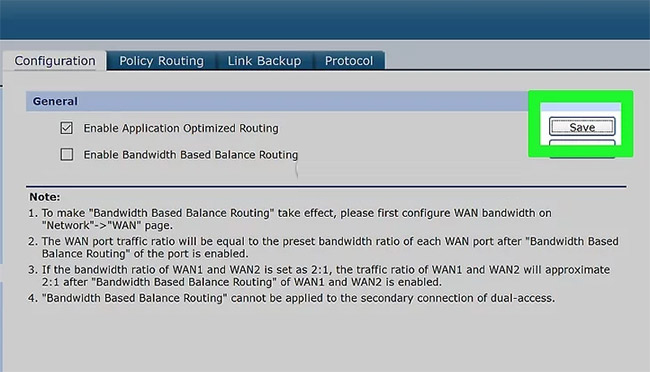
8. Click OK or Save. Your settings will be saved.
9. Enjoy your connection speed. If you have completed the load balancing router setup and your computer is now connected to the load balancing router in the Wi-Fi menu, you should notice a difference in your browsing speed.
Method 4: Using Speedify
How to link and speed up your connection
Speedify comes into its own when you need a fast or stable connection. Speedify is a combination of a load balancing and VPN software suite from Connectify, a familiar name in the space. The Connectify Dispatch app eventually became Speedify. Connectify Dispatch is a load balancer that distributes your computer's traffic across all the available Internet connections your computer has access to. Think of it as the Voltron of the Internet world: Each individual Ethernet connection, street Wi-Fi, and 4G phone is given maximum power, but doesn't throttle each other.
Speedify does (almost) everything Dispatch does, but it also includes a built-in VPN. While it’s not designed for security or privacy, it does have some smart traffic shaping upstream at Speedify’s servers, so your traffic is automatically sent to the connection that’s best for it. It also offers seamless failover, so if your hotel Wi-Fi goes out, you can keep browsing on 4G without missing a beat. Even apps that can use multiple connections, like Dropbox and security-focused VPNs (which you’re likely to run through Speedify), can be optimized.
Speedify isn’t free, though. You can try it for free for up to 1GB to see if it works for you and the connections you have available to link, but then you can get 50GB for $9/month or $69/year or unlimited data for $19/month or $149/year. It's available for both OS X and Windows. The license will give you one account, which you can use on multiple computers (for personal use).
Getting started with Speedify is pretty easy. With the free trial, here's what you need to do to get set up.
Create a free account on Speedify.com. Once your account is created, you'll have a username and password to log in to the Speedify service.
Connect your computer to Ethernet, connect it to your local Wi-Fi network, and plug in a 4G USB stick or set up your phone for USB tethering. If you have another Wi-Fi card, like a USB Wi-Fi adapter, plug that in. Basically, connect any network adapters you want to use with Speedify and make sure they’re turned on. Doing this ensures the adapter is available even when you’re not using it, so Speedify can see it.
Next, download the Speedify desktop app for Windows (Windows 7 or 8) or OS X (10.8+).

Now, run the Speedify installer. In Windows, Speedify will ask for confirmation during installation as it adds a virtual network adapter to your system. In OS X, the app will do the same thing and ask you to enter your system password twice to complete the installation and run it for the first time.
Once the installation is complete, Speedify will prompt you to sign in or create an account. Since you created your account in step one, go ahead and log in. It automatically connects you to the best Speedify server near you, then automatically balances all the network connections your computer has available. It also runs a small network speed test, and you’ll see the connection speed, both up and down, between your computer and the cloud on the network displayed as a rainbow, along with a list of all the available network adapters. Keeping the window open, you can see what happens when the connection drops or when you actually put that speed to the test.
Once set up, using Speedify is pretty straightforward. You can click on the name of the Speedify server you’re connected to at any time, to select a different server or see what the latency is like on that server. If you need to do some torrenting, you’ll want to switch to a P2P-friendly server with low latency. In our tests, Speedify performed quite well. Try firing it up, downloading some large game patches, and then streaming a movie. With a nearby Wi-Fi network (probably Comcast), local wired Ethernet (also Comcast), and 4G (Verizon Wireless) all connected, the downloads aren’t much faster, but streaming videos and music is smoother and lag-free.
Other Settings to Enable
By default, Speedify is pretty well configured. That means that in most cases, you can just open the app, connect, and not worry about anything else. However, there are some other useful features that you might want to try in different situations.
Prioritize Your Connections Manually

Speedify makes sure that if any of your connections drops, the others will continue to do their part. For example, if something happens to the hotel Wi-Fi you’re using, Speedify will continue to handle the traffic over another available network. However, you can also set priorities on each connection, rather than treating them all the same. Just open the Speedify status window, select the best connection from the list (like your home Ethernet), and set it to “always” to always use that connection if possible. You can then set your connected 4G phone as the secondary choice, meaning the app will choose that connection if it’s available. You can then set up a free nearby Wi-Fi (a Wi-Fi network you’ve connected to before), and the app will only use the backup network if the other networks drop or you really need the bandwidth. That level of control is great if you have multiple networks available, but don’t necessarily want to use them all at once.
Fix a Flaky Connection with Redundant Mode

If you’re somewhere with a lot of flaky internet connections, turn on Speedify’s Redundant Mode. Once set up, one of the connections will be the primary connection, and one of the others will be the secondary, and the app will essentially send all the same data over both networks at once. This means that if one network goes down, even for a second or two, any missed information will be picked up by the other. The end result is lower latency and more uptime, even if all of your available networks are unstable. In testing, the app performed admirably. A weak Wi-Fi signal from home and a nearby coffee shop network had slow but stable speeds.
Get the best signal by switching servers

The benefit of being a VPN is that all traffic is routed through Speedify servers. While Speedify automatically chooses the closest server when you log in, you can change it at any time. This is especially useful if you like to move around different locations while streaming something. You can choose from servers in the US, Canada, Brazil, France, Germany, Ireland, Italy, the Netherlands, Spain, the UK, Hong Kong, Japan, Singapore, and Australia. In most cases, there’s only one server in each country (except for the nine in the US), but it’s nice to have multiple geographical options if you need them.
Speedify isn’t perfect

Speedify isn’t perfect, of course. For example, if you want extra security, you can run your own VPN app while connected to Speedify and further encrypt your traffic. Speedify says it can speed up VPN traffic, but in our tests, the impact was negligible. But thankfully, it didn’t slow down traffic either. Still, it’s a bit redundant to link two or three Internet connections and then use just one of them for everything because you have a VPN enabled.
Likewise, if you’re worried about the safety of your personal data when using Speedify, there’s some good news. To protect users, Speedify’s privacy policy and terms of service are evolving, and they don’t store or collect any data from users or browsing sessions.
That said, if you’re security conscious across all systems or if you’re doing any sensitive work, it’s still a good idea to use a VPN that focuses on security over speed. This is especially important if you’re traveling or using untrusted networks, which are where Speedify comes in. You probably won’t need to chain a bunch of connections together when you have a strong, stable connection at home (and even then, you have two networks available: a home network and a smartphone).
Speedify is great at pooling all your available connections into one big network, which can provide more bandwidth and faster speeds no matter what you’re doing. Of course, this comes at a cost. As long as you’re surfing the web, streaming videos, gaming, or doing anything else where security isn’t a big concern, it can be a great tool for getting the most out of multiple networks. While it’s not free, if you’re tired of unstable connections, Speedify is effective and easy to use.


No comments:
Post a Comment