The Internet has become an important part of our daily lives, allowing us to stay connected and access information at our fingertips. Therefore, having an easy way to manage and customize the online experience is crucial. Windows 11 gives you a bunch of options to customize your browsing experience through Internet Options.
In this article, I will show you how to open Internet Options in Windows so you can easily modify their settings.
1. How to open Internet Options with the Windows Search tool
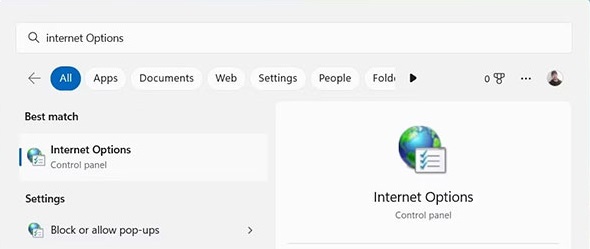
The Windows Search engine is one of the most powerful tools available in Windows 11. Using this tool, you can access Internet Options and customize browser settings for maximum performance. Here's how to do it:
1. Press Windows Key + S on the keyboard.
2. Type Internet Options in the search bar. A list of results will appear on your screen showing possible matches.
3. Click Internet Options from this list.
This will open a dialog box where you can adjust various settings related to Internet usage, such as security levels and privacy preferences.
2. How to open Internet Options through the Run tool
The Run tool allows you to launch programs and open files easily without having to search through all your system folders.
1. Right-click Start and select Run from the menu list.
2. Type inetcpl.cpl in the command line and press Enter on the keyboard or click OK.
When you do that, you'll be taken directly to a window where you can customize your connection settings and delete temporary files, history, cookies, and web information.
3. How to Open Internet Options from Control Panel
Control Panel is a powerful tool for managing, configuring and maintaining the Windows operating system. It gives you access to a wide range of options and settings that allow you to customize your overall experience.
One of the most useful features of the Control Panel is its ability to open Internet Options with just a few clicks. Here's how to do this:
1. Open Control Panel.
2. Change the screen view to Large icons.
3. Then, click Internet Options.
4. How to open Internet Options through Task Manager
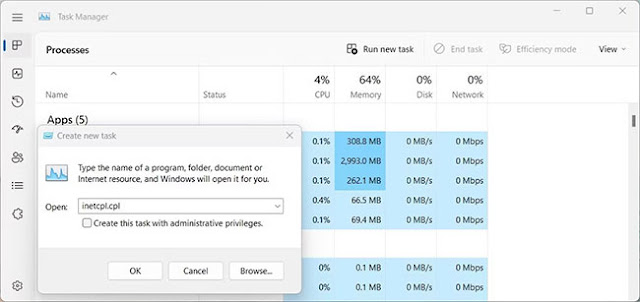
Task Manager is an important tool that allows you to monitor and manage processes related to your computer's performance. It can help you identify and launch programs without having to navigate through menus. To open Internet Options through Task Manager, follow these steps:
1. Click the Taskbar and select Task Manager. You can also press Ctrl + Shift + Esc on your keyboard to directly open the Task Manager.
2. Next, click More Details to view additional information.
3. Select Run new task at the top of the Task Manager window.
4. Enter inetcpl.cpl in the field and click OK.
Now you can access Internet Options!
5. How to Open Internet Options via Windows PowerShell
PowerShell is a command-line shell and related scripting language that automates tasks and manages configuration. With this tool, you can easily access various applications installed on your computer. To open Internet Options, follow the steps below:
1. Right-click Start and select Terminal from the Power User menu.
2. In Windows PowerShell, type the following and press Enter:
inetcpl.cpl
3. This will open Internet Options on your Windows computer.
6. How to Open Internet Options with Command Prompt
Command Prompt is another command line tool that you can use to run various commands on the Windows operating system. To open Internet Options using Command Prompt, do the following:
1. Open Command Prompt with admin rights.
2. Type inetcpl.cpl into the Command Prompt and press Enter.
The Internet Options program starts immediately and is ready to use.
7. How to Open Internet Options from Windows File Explorer
File Explorer is a file management utility that allows you to easily access, view, and manage files stored on your computer. You can also use this tool to open applications installed on your Windows PC. To do this, follow these steps:
1. Click Start and search for Windows File Explorer.
2. Then select the result from the top of the list.
3. From there, go to the address bar, type inetcpl.cpl and press Enter.
Now you're ready to customize your Internet experience with just a few clicks!
8. How to open Internet Options with a desktop shortcut
Create desktop shortcuts to your most used programs so you can easily access them at any time. This way you will be able to open an application faster as it will be at your fingertips. To open Internet Options with a desktop shortcut, follow these steps:
1. Right-click an empty space on the desktop and select New.
2. Then click Shortcut in the menu list.
3. When the Create Shortcut window appears, enter C:\WINDOWS\system32\inetcpl.cpl and click Next.
4. Name the shortcut Internet Options.
5. When you are done with your changes, click Finish.
You will find Internet Options as a desktop shortcut; just double click it to run.
Alternatively, you can also create a desktop shortcut using File Explorer. Here are the steps you need to follow:
- Press Win + E on your keyboard to open Windows File Explorer.
- Next, browse to the following locations: C:\Windows\System32\
- In the search box, type "inetcpl.cpl" and press Enter.
- Right-click the inetcpl.cpl (.cpl) file and select Show more options > Create shortcut.
- Make sure you click Yes when asked to confirm the shortcut. Desktop shortcut will appear on your desktop.
9. How to open Internet Options with keyboard shortcuts
The operating system is designed with keyboard shortcuts to help users navigate their computers with ease. Windows 11 has many ways you can open Internet Options, but using keyboard shortcuts is one of the fastest and most effective methods.
1. To get started, create a desktop shortcut.
2. Right-click the shortcut icon and select Properties.
3. In the Shortcut field, enter any letters or numbers you want to use.
4. Click Apply > OK to save the changes
When you're done, just press Ctrl + Alt and then type the letter or number you've chosen as the shortcut. It will only take a moment to open Internet Options. For example, if you choose 9 then you can press Ctrl + Alt + 9 on your keyboard to open Internet Options.


No comments:
Post a Comment