VLC is a popular media player that can play a variety of video and audio formats. But sometimes, it encounters unexpected problems, such as not playing videos.
Although it may take some time, it will be quicker to resolve this than downloading and setting up a new media player. If you are in a similar situation, read on to learn how you can fix VLC Media Player on Windows 11.
1. Check the file format
VLC Media Player is compatible with many video formats, but not all of them. If you try to play an unsupported video format on VLC, it will show a black screen or an error message. You can visit the official VLC features website to learn about the different file formats the tool supports.
If VLC doesn't support your chosen video format, you can use an online video converter to turn it into the format you want.
2. Disable hardware acceleration on VLC
VLC comes with hardware acceleration that speeds up the encoding and decoding of certain types of videos. However, it can cause compatibility issues on some computers, especially those with faulty hardware drivers.
So if you're having trouble playing videos in VLC, disabling hardware acceleration might be a good solution.
1. Open VLC Media Player.
2. Click Tools and select Preferences from the context menu.
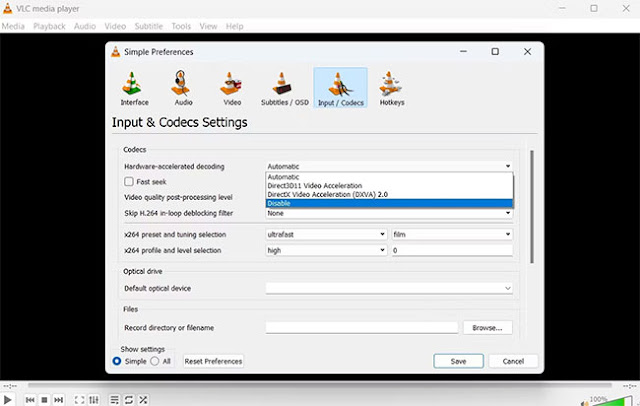
3. Switch to Input / Codes tab.
4. In the Codec section, click the drop-down arrow next to Hardware-accelerated decoding and select Disable.
5. Click Save.
Now, relaunch VLC Media Player and check if you can play any video. If not, try the next solution on the list.
3. Change the File Catching and Network Catching values
While streaming over the Internet, VLC stores a small amount of content on the system, which helps it to provide continuous playback even if the connection is interrupted. If VLC can't play streaming video, it can be said that the current network cache size is not large enough for the video. This situation mainly arises when you try to stream a large video.
The solution in this case is to increase the network cache size. To increase the network cache size in VLC, follow the instructions below.
1. Open the Preferences window of VLC Media Player.
2. Switch to Input / Codecs tab.
3. Click the All button in the Show settings section.
4. Select Input / Codecs from the left panel.
5. In the right panel of the window, find Network caching (ms). It will be in the Advanced section.
6. Change the Network caching value to 1500.
7. Click Save.
A similar problem can arise with videos stored on the local hard drive. If the video you are trying to play is large (over 15GB), VLC will have trouble loading it and cause problems. The situation mainly arises when other programs or operating systems use most of the available disk space.
To solve this problem, you will have to increase the file caching size on VLC.
1. Go to Preferences > Input / Codecs > press the All button > Input / Codecs.
2. Select Input / Codecs from the left panel.
3. In the right panel, locate File caching (ms).
4. Change the File caching value to 2000.
5. Click Save.
Check if the problem is fixed or not.
4. Select DirectX (DirectDraw) as default video output mode
By default, VLC keeps the video output mode as OpenGL video output for Windows. But sometimes, this output mode may not play certain types of videos. The solution in this situation is to set the output mode to DirectX (DirectDraw). To do this, follow the steps below.
1. Open the Preferences window and switch to the Video tab.
2. Click the drop-down icon next to Output and select DirectX (DirectDraw) Video Output Mode from the context menu.
3. Check the box before the Accelerated video output (Overlay) and Use hardware YUV -> RGB conversions options.
4. Click Save.
5. Reset VLC options
The preferences file stores all the important settings for VLC. If it has been corrupted for some reason, VLC will start to behave abnormally. It may not play the video or certain commands will not work as expected.
Fortunately, you can quickly bring VLC back to its original healthy state by resetting the preferences file. To do this, open the Preferences window and click Reset Preferences at the bottom of the screen. Confirm your choice by clicking the OK button from the prompt that appears.
Next, restart VLC Media Player and check if you can play the video.
6. Download the latest VLC update
VLC regularly receives updates to fix bugs, add features, and more. If VLC can't play videos due to bugs in the application, downloading the latest update can be an effective solution.
1. Open VLC and click the Help button in the top bar.
2. Select Check for Updates from the context menu.
7. Reinstall VLC Media Player
If none of the solutions help, there may be an error with the installation file. As a solution, you will have to reinstall VLC Media Player. To do this, open Control Panel and select Uninstall a program. Locate, right-click on VLC Media Player and select Uninstall from the context menu.
Now, go to the official VLC website and download the latest version of the app.
VLC is one of the best media players for Windows. On it, you can play videos in most of the available formats, increase the volume by more than 100%, add various effects and filters to the media content.
However, like any other app, it can crash from time to time. If VLC Media Player cannot play videos on Windows, try the above solutions to fix the problem quickly.


No comments:
Post a Comment