Sometimes, one of your external devices may stop working suddenly without warning. If you've tried reconnecting the device, using a different USB port, or even connecting it to a different computer without fixing the error, it's most likely not moved.
On Windows computers, devices “migrate” to the latest installed updates. If during the update process the driver migration is stopped or interrupted, you will get a "Device Not Migrated" error. Here's how to fix it.
How to check if the device has been moved
Unlike most Windows errors, it does not appear on your screen and you will have to look for it in Device Manager.
1. Right-click the Start button and open Device Manager.
2. Then, right-click the malfunctioning device driver and select Properties.
3. Open the Events tab and check for the Device not migrated error.
Usually, you will encounter an error after updating the system. However, you will also face the same problem if the system's peripheral driver is currently supported by Windows, the device driver is damaged, or if you have two operating systems installed.
If you've discovered an error on your computer, here's how you can fix it.
How to fix "Device Not Migrated" error in Windows 10
1. Plug USB Device into Another Port
Sometimes, a glitch in the USB port might trigger the device not migrated issue. The easiest way to fix this problem is:
1. Either, connect a different USB device to the same port.
2. Or, connect the device to a different port.
2. Restart the PC
When troubleshooting on a computer, you should begin the troubleshooting process by restarting the system. The Device not migrated error can be a temporary problem that will go away after a reboot.
3. Update Windows
Microsoft constantly releases new updates to keep Windows running smoothly. If you’ve encountered the device not migrated error, updating your operating system could solve the problem.
To update to the latest Windows version,
1. Right-click the Start button and head to Settings.
2. In the Settings window, select Update & Security and click the Check for updates button.
3. Restart your PC to complete the installation.4. Run SFC Scan
Windows 10 users can automatically, scan and repair their system files by running System File Checker. It is a built-in tool that lets the user delete files and fix issues like device not migrated error.
Note: We shall boot the system in Safe Mode before initiating the scan for better results.
1. Press Windows Key + R keys together to launch Run Dialog Box. Then, type msconfig and hit Enter to open the System Configuration window.
2. Here, switch to the Boot tab.
3. Check the Safe boot box under Boot options and click on OK, as depicted.
4. Confirm your choice and click on Restart. Your system will be booted in safe mode.
5. Search and then, Run Command Prompt as administrator through the search bar, as shown. Type sfc /scannow and hit Enter.
6. Wait for the Verification 100 % completed statement, and once done, reboot your system.
5. Update Drivers
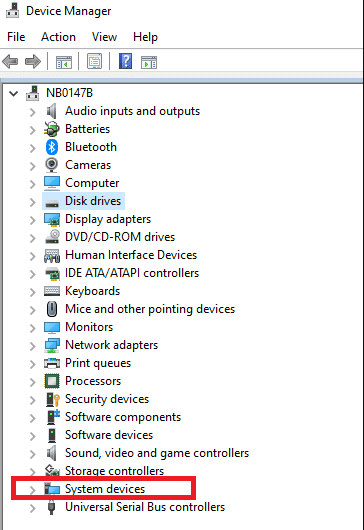
1. Search and launch Device Manager from Windows search bar, as shown.
2. Double-click on System devices to expand it.
3. Now, right-click on any chipset driver (e.g. Microsoft or Intel chipset device) and click on Update driver, as depicted.
4. Now, click on Search automatically for drivers to automatically install the latest driver.
5. Windows will scan for driver updates and automatically install them. Once installation is finished, click on Close to exit the window.
6. Restart the computer, and check if you have fixed the device not migrated error on your Windows 10 PC.
6. Reset BIOS
If the BIOS settings are not configured correctly, then there are higher chances that you may encounter device not migrated issue. In this case, reset BIOS to factory settings to fix it.
Note: The reset process for BIOS may vary for different manufacturers and device models.
1. Press Windows Keys+ I keys together to open Settings in your system.
2. Now, select Update & Security.
3. Now, click on Recovery in the left pane and select the Restart now option under Advanced startup.
4. Now, your system will restart and enter into Windows Recovery Environment.
5. Here, click on Troubleshoot, as shown.
6. Now, click on Advanced options followed by UEFI Firmware Settings, as highlighted.
7. Click on Restart to boot your system in UEFI BIOS.
8. Navigate to the Reset option that performs the BIOS resetting process. The option may read like:
- Load Default
- Load Default Settings
- Load Setup Defaults
- Load Optimal Defaults
- Setup Defaults etc.,
9. Finally, confirm BIOS reset by selecting Yes.
10. Once done, select the option titled Exit and restart your Windows PC normally.
We hope that this guide was helpful and you could fix the device not migrated error on Windows 10


No comments:
Post a Comment