When Microsoft announced Windows 11, it also came with strict hardware requirements. However, things were different when it was released. Many tools have appeared to install Windows 11 even without the onboard TPM module. It is also known to have worked on the MacBook, its security module. Although Microsoft has allowed it because there is no backend, the Windows Team will soon start adding warnings to such PCs using the watermark.
System Requirements What is a Watermark Failed?
If you've seen or installed the Insider build, you already know about watermarks. It appears as text at the bottom right of the screen. This new watermark will be on the same lines and display the text as— System requirements fail to pass build number 12345. Along with that, a message is also displayed on the System section of the settings.
How to Remove the "System Requirement Not Met" Watermark
If you see the "system requirements not met" watermark on your PC, you can remove it by modifying a DWORD value in Registry Editor.
1. Press Windows Key + R to open the Run dialog. Type regedit and click OK to open the Registry Editor.
2. In the Registry Editor, navigate to the following path. You can also copy and paste the path in the Registry Editor address bar for quick navigation.
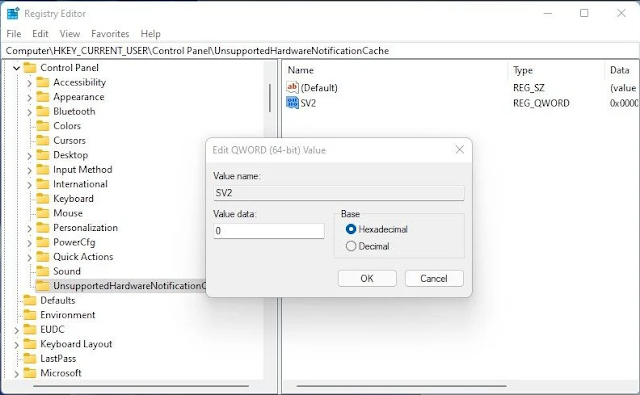
HKEY_CURRENT_USER\Control Panel\UnsupportedHardwareNotificationCache
3. In the right pane, right-click on the SV2 DWORD value and select Modify.
4. Enter 0 into the value data field.
5. Click OK to save the changes.
Close the Registry Editor and restart your PC to apply the changes. After the restart, Windows 11 will not show the unsupported hardware watermark anymore.
If you don’t have the UnsupportedHardwareNotificationCache key, you will need to create a new one and set the value for it. To do this:
1. Press Windows Key + R to open the Run dialog. Type regedit and click OK to open the Registry Editor.
2. In Registry Editor, right-click on the Control key HKEY_CURRENT_USER\Control Panel and select New > Key.
3. Next, rename the key as UnsupportedHardwareNotificationCache.
4. Next, right-click on the new key and select New > DWORD (64-bit) value.
5. Rename the value as SV2.
6. Next, modify the SV2 DWORD value and set its Value data to 0.
7. Click OK to save the changes.
It is possible that the watermark will reappear with new updates. So, you will need to repeat the steps after installing the update to keep your desktop clean.
Video:


No comments:
Post a Comment