There are many ways to protect folders and sensitive data, such as hiding them in hard-to-find locations, storing them in removable storage devices and putting them in safes, saving them in the cloud with strong passwords. But if you often have to access them, you will have to leave them on your computer, even in the most accessible places. Then, a more effective way to protect the home directory is to hide, password or encrypt.
A. Hide any folder using Windows built-in option
Windows has a built-in tool for you to hide the folder you want to hide. This is a poor security method, not used to protect important data. You can also use this tool to hide folders that you find annoying.
- Go to File Explorer and find the folder you need to hide
- Right click on the folder and select Properties
- Click in the box Hidden and then click OK
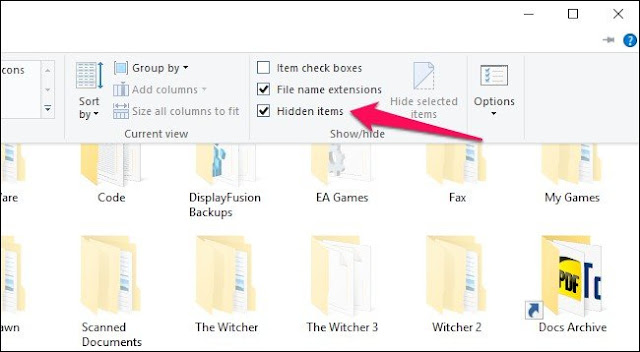
To view the files again, all you need to do is on the Folder Options window, uncheck the boxes for Show hidden files, folders, and drives and Hide protected operating system files. Or you can click the Hidden items box in the View menu of File Explorer.
B. Turn a regular folder into a hidden system folder using Command Prompt
This way is a bit more difficult than the previous one, so of course the security will be higher. To do this successfully, you will have to work a bit with the Command Prompt command line window.
1. Press Windows Key + R to open Run and then type cmd and Enter to open Command Prompt
2. Type the following command into the Command Prompt:
attrib +s +h “folder_or_file_path”
ex: attrib +s +h “C:\Users\lexth\Desktop\user”
3. Immediately the directory that you assign to the path of the command will switch to completely hidden mode.
4. Even if you have enabled the Show hidden files and folders option in Folder Options, the folder or file that you have hidden in the above way will not appear.
5. Now, to show the folder or file you have hidden again, just change the "+" to "-" in the command you used above.
attrib -s -h “folder_or_file_path”
And according to the example, we will have the complete command as:
attrib -s -h “C:\Users\lexth\Desktop\user”
The hidden folder or file will appear as soon as you press the ENTER key to execute the command.
C. Encrypt files or folders without installing additional software
Encryption is an effective way to protect your files. Microsoft has built-in an encryption tool in Windows for you to easily protect your data.
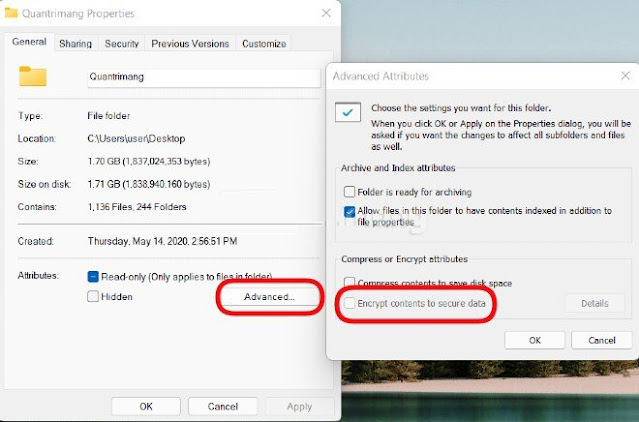
- Right-click on the file or folder to be encrypted and select Properties
- Click the Advanced button
- Click on Encrypt Contents to Secure Data and then click OK
- Click Apply to finish
- If the file is encrypted, the system will send a suggestion that you should encrypt both the file and its parent directory
- After encryption, the file or folder will turn green
The only downside to this method is that it binds encryption to your user account. This means that other accounts on the same computer cannot open files or folders that you have encrypted. However, if you use the same account, this method will not work.
D. How to hide and access hidden folders with *BAT . file
1. Before you start you must create a folder to store the folders that need to be protected. To do this you just need to create a folder in the usual way and give it any name.
2. Navigate to the folder you just created, open that folder and proceed to create a new Text Document by right-clicking on any empty space in the folder, selecting New => Text Document.
3. Open the Text Document file you just created, copy and paste the code below into it:
cls
@ECHO OFF
title Folder Private
if EXIST "HTG Locker" goto UNLOCK
if NOT EXIST Private goto MDLOCKER
:CONFIRM
echo Are you sure you want to lock the folder(Y/N)
set/p "for=>"
if %cho%==Y goto LOCK
if %cho%==y goto LOCK
if %cho%==n goto END
if %cho%==N goto END
echo Invalid choice.
goto CONFIRM
:LOCK
Ren Private "HTG Locker"
attrib +h +s "HTG Locker"
echo Folder locked
Goto End
:UNLOCK
echo Enter password to unlock folder
set/p "pass=>"
if NOT %pass%== PASSWORD_GOES_HERE goto FAIL
attrib -h -s "HTG Locker"
lace "HTG Locker" Private
echo Folder Unlocked successfully
Goto End
:FAIL
echo Invalid password
goto end
:MDLOCKER
md Private
echo Private created successfully
Goto End
:End
Note: In the above code, replace PASSWORD_GOES_HERE with the password you want to set. Finally, in Save as type select All type, name the file locker.bat.
4. Now you can delete the original text file.
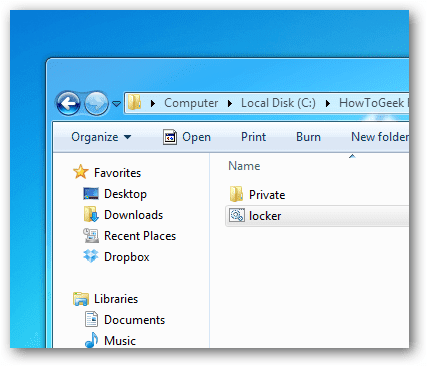
5. Next, double click on the locker.bat file to open the file. It will now create a new folder named Private. This Private folder is where you can store all your important files and folders....
6. After moving the data to be secured to the Private folder, double-click the locker.bat file.
Immediately a command line dialog box will appear asking if you agree to hide this folder, just type Y and then press ENTER.
7. Once done, the Private folder will disappear.
8. If you want to access the Private folder, double click on the locker.bat file and proceed to enter the password you have set in the command line window and press ENTER.
How to view files?
To view the files again, all you need to do is on the Folder Options window, uncheck the boxes for Show hidden files, folders, and drives and Hide protected operating system files.
Then on the screen will appear a warning window as shown below:
If you accidentally forgot your password
If you accidentally forgot your password or if you want to change it, all you need to do is right-click on the locker.bat file and select Edit and proceed to change the password.
The above method only helps to protect your sensitive files from prying eyes. Those who know this trick or are computer savvy can easily open the file you have hidden, then you need a tool to set a real password for the folder.


No comments:
Post a Comment