In Windows 10, File Explorer opens Quick Access by default. Quick Access displays frequently visited folders (up to ten) and recently accessed files (up to twenty) so that you can easily access recently accessed files and files. Frequently accessed folders without navigating to them. Quick Access is useful for those who want to see all recently accessed files and folders when they launch File Explorer.
Once Quick Access is opened, you need to click the This PC icon in the left navigation pane to switch to This PC.
Windows users who are accustomed to seeing this PC or PC when launching File Explorer may also want to get this PC or PC under Windows 10. In one of our previous articles, we talked about using Use AutoHotKey software to set Windows + E hotkey to open this PC or PC in Windows 10.
Fortunately, it is now possible to set File Explorer to open this PC instead of Quick Access. Windows 10 now allows you to configure File Explorer to open for this PC without the help of any third-party utilities. An option is in Folder Options to make File Explorer open this PC.
Method 1. Set File Explorer to open this PC in Windows 10
1. Click the File Explorer icon on the taskbar to open Quick Access. Alternatively, you can open any folder or drive.
2. Click the File menu and then click Options or Change Folder and search options to open the Folder Options dialog box.
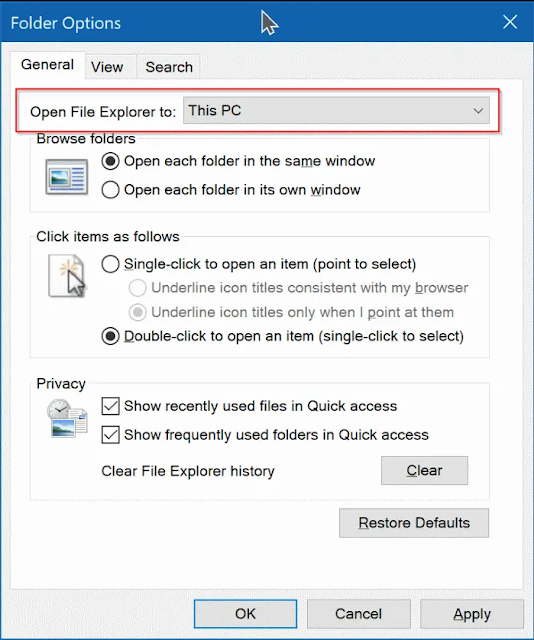
3. Here, under the General tab, select this PC from the drop-down menu right next to the option Open File Explorer to.
4. Finally, click the OK button. That's it! You don't need to restart or sign out to see changes. From now on, File Explorer will always be open for this PC instead of Quick Access.
Method 2. Make this PC the default in Windows 10 File Explorer
1. Open a folder anywhere on your PC.
2. Click the File menu button (located on the upper left side of the window), then click Options or Change folder and search options to open Folder Options.
3. In the General tab, expand the menu next to Open File Explorer as an option and then choose This PC from the drop-down menu.
4. Click the Apply button.
Video:


No comments:
Post a Comment