If you are running a regular home network, devices get their IP addresses through the Dynamic Host Configuration Protocol (DHCP). This means they are assigned an IP address the next time they connect to the network and in fact they may get a completely different address the next time they connect.
Whether or not the device uses DHCP is a per-connection setting. In other words, if you disable DHCP for your wired connection, all wireless connections will continue to use DHCP until you do so.
Disable DHCP for connections in Windows
1. Press the Windows Key + X , then select Settings.
2. Click the Network & Internet item.
3. Click the network connection (wired or wireless) (such as Ethernet) that you want to configure, and then click the Properties button.
4. In the connection details section, you will see the IP settings section. Click the Edit button which you will find there.
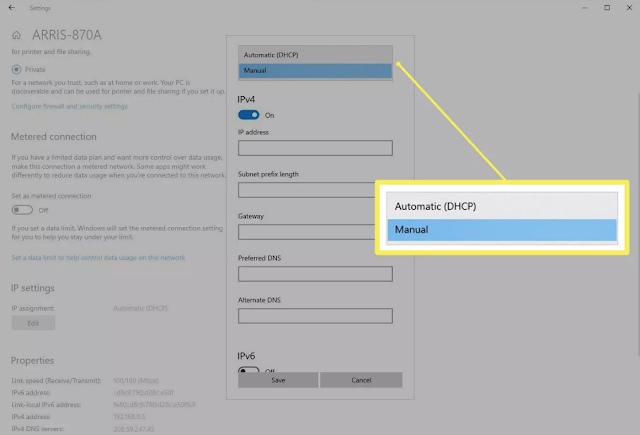
5. In the Edit IP settings dialog box, the connection will most likely be configured as Automatic. Click the drop-down menu and change it to Manual.
6. You'll see two toggle switches show up, one for IPv4, and one for IPv6. You can enable either or both of these, the process is the same for each. We'll click the one for IPv4 for the purposes of the next step.
7. A slew of new fields will appear. you'll need to fill these out to include at least the IP address (the address you want the machine to have, of course), the Subnet prefix length (this describes the class of the network, try 24 here, and if that doesn't work, 16), Gateway (the address of your router device, most likely 192.168.0.1), and Preferred DNS (you can use one provided by your ISP, or try Google's if you can't find one: 8.8.8.8).
8. Click Save to make the changes.
Note: You can also set the same setting for a network connection from the Control Panel > Networking and Sharing Center > Change adapter settings. Select your desired connection and click the Change settings of this connection button. Then click the Internet Protocol Version 4 (TCP/IPv4) option (but don't clear the checkbox), and click the Properties button. This will give you a dialog similar to the one you saw in Settings, just in the "old school" Windows style. Note you can set IPv6 in the same way.
Enabling DHCP in Windows
While it's something of an undertaking to disable DHCP for a connection, it's much easier to re-enable it.
1. Return to Settings > Network & Internet, and click the Properties button for network connection.
2. Click the Edit button in the the IP settings section for the connection.
3. The Edit IP settings dialog will contain your prior configs. Click the drop-down at the top of the dialog and switch it from Manual back to Automatic.
How DHCP works
Most modern network equipment is configured to act as a DHCP server by default. These devices, like your home router, will listen for new devices on the network that are requesting an IP address. They will then assign that address and make sure it's reserved and not assigned to anything else.
On the other hand, most computer and mobile device operating systems are also set by default to be a DHCP client or to request an IP address from a DHCP server as soon as they connect to the network. This is what allows you to simply plug in an Ethernet cable or connect to a wireless network and stay "on the Network" - no fuss, no fuss.
Reasons for disabling DHCP
However, DHCP essentially means that your device can have different addresses from time to time, and there are several reasons why you might not want this. A good example is if you are running a server, such as a self-hosted web server.
You will need a consistent way of contacting that server, and the easiest way to get there is by giving it a static IP address i.e. you will actually configure the machine yourself using the IP address. On the plus side, this means you have control over which address your machine gets. However, you will need to be careful with those configurations, especially when it comes to not copying any of the addresses.


No comments:
Post a Comment