Sometimes the cache may have issues, and you find that the display output is not working properly when you connect to an external monitor.
If this happens, you can reset and clear the display cache to see if that fixes the issue. When you reset and clear the display cache, it will force Windows 10 to forget any connected external monitors and their individual settings stored in the display cache on the computer. The next time you connect to an external display, it will be treated as a newly connected display using the default and optimal settings again.
This tutorial will show you how to clear and reset the external display cache in Windows 10.
1. Press Windows Key
 + R and let Run dialog box appear. Type Regedit and press the Enter key.
2. At this time, UAC will prompt. Click on Yes button and allow this app to make changes to your device.
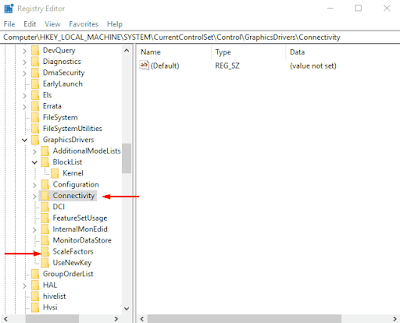
3. Inside the Registry Editor app, navigate to the following path –
HKEY_LOCAL_MACHINE\SYSTEM\CurrentControlSet\Control\GraphicsDrivers\
4. On the following result, do a right-click on the subkey Configuration.
5. From the context menu of the key, select the Delete option.
6. Similarly, locate two other subkeys Connectivity and ScaleFactors. Right click on both of them one after another and choose Delete each time.
7. Finally, restart your device to save the changes done by the Registry tweak
Video:


No comments:
Post a Comment