This article will show you how you can solve this Microsoft photos app slow issue. There are three options to do that. Let’s explore all them. The first one is: Fix this issue with Microsoft store Apps troubleshooter. The second option is: Repair and Reset the Microsoft photos app. Most probably the issue should be fixed after the second one. If it doesn’t fix then you could uninstall the Microsoft photos app completely from your computer and then reinstall it again from the Microsoft app store. This is the full and final solution to fix this Microsoft photos app all the issues. Follow the following step by step guide on how to fix the Microsoft photos open slowly issue. So let’s get started.
Method 1: Repair and Reset Microsoft photos app
1. Press the Windows key
 and type apps, then click on Apps & features.
2. Scroll down the app list and locate Microsoft Photos, then click on Microsoft Photos and click Advanced options.
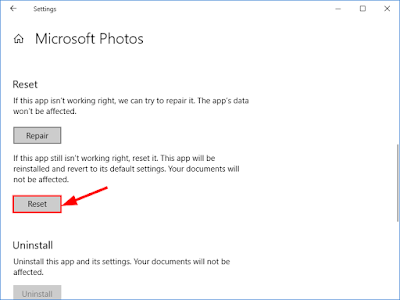
3. Scroll down and click on the Repair button under the Reset section.
4. Launch Microsoft Photos and check if the Windows 10 Photos App Not Working problem has been solved. If it is working right, then great. But if it still doesn’t work, move on to 5).
5.Kindly note that your documents and photos remain intact whereas your preferences and sign-in details will be removed after clicking the Reset button to reset your Microsoft photo app.
6.Click Reset in the pop-up window to confirm the photo app reset.
7.Check if Microsoft Photos opens photos properly this time.
Method 2: Run Microsoft Store Apps Troubleshooter
1. Start menu –> Settings –> Update & Security –> Troubleshoot –> Windows Store Apps and click Run the troubleshooter.
2. Click on Next button and follow the on-screen instructions to complete the troubleshooting
3. Finally, close the troubleshooter and then check if your problem is solved.
Method 3: Uninstall and then Reinstall the Microsoft photos app
1. Press the Windows Key
 + X at the same time. Then, Click on the Windows Powershell(Admin)
2. Click on Yes if prompted
3. Now, as the Windows Powershell opens put the following command there and hit the Enter button
get-appxpackage Microsoft.Windows.Photos | remove-appxpackage
4. This will uninstall the application on your PC.
After entering the command, A ‘Deployment operation progress …’ message will temporarily appear and disappear when the uninstallation is done as shown above.
1. Now you can see that Microsoft Photos app has now been uninstalled from your Windows 10
2. Now in order to reinstall the Microsoft Photos App, open up the Microsoft Store either by clicking on the Store Icon located on the taskbar or from the Windows Start menu Tile under Explore section as shown above.
3. After Microsoft window launch up, click on the search icon to enable search and type in Microsoft Photos, from the search list click on the Microsoft Photos App as highlighted above.
4.Now click on the Install button and wait till the installation is completed as shown above.
5. After the installation is complete open any image to see if now your App is working properly or not.
Solution 4: Set Windows Photo Viewer as Default Application
1. Click the link to download the Windows Photo Viewer Registry File.
https://drive.google.com/file/d/1p3dZLiiFF4-wqK5yTrzUGmWzOh5YvUVU/view?usp=sharing
2. Now double –click on the Restore_Windows_Photo_Viewer_CURRENT_USER registry file as highlighted above.
6. Another pop-up message will appear asking you if you trust the source of this information. Simply click the Yes button to finish installing the registry file on Windows.
Now, most probably the registry file will be added in your Windows Registry by now. Just follow the steps below to Apply windows Photo Viewer as the default photo viewer app for your Windows 10.
7.Open settings from Windows Start menu. From the Windows start menu, open up the Windows settings by clicking on the settings icon as shown above.
11. After clicking on the Photo Viewer option a pop-up box will appear asking you to choose the default app from the listed apps as shown above. You can see that the Classic Windows Photo Viewer has been now added to the list as shown above. Simply click on the Windows Photo Viewer option to apply it as the default app for the photo Viewer for Windows 10.
That’s it! Hope this article helped you on the slow opening of the Windows Photo App in Windows 10. If you have any confusion or experienced any difficulty following the instructions, please let us know in the comments section below.


No comments:
Post a Comment