There are several reasons like low virtual memory, third party software conflicts, Driver Incompatibility, Registry bug or virus threat on the computer etc cause 100% Memory usage on Windows 10. If you are also struggling form this problem, here effective solutions to fix 100% memory usage on windows 10
Method 1 : Close unnecessary programs
If the high memory usage is caused by the computer running multiple programs at the same time, users could close the program to solve this problem. Or if a program occupies too much memory, users can also end this program to solve this problem.
1.Right click on task bar and open Task Manager
2. Then right click the application you want to end up under Processes and choose End task.
Method 2 : Fix High Memory Usage from System Registry
1. Press Windows Key
 + R. Type in Regedit in the box, and then press the Enter key
2. Find and access HKEY_LOCAL_MACHINE\SYSTEM\CurrentControlSet\Control\SessionManager\Memory Management
3. Right-click on ClearPageFileAtShutDown, then choose Modify… and change the value to 1.
4. Restart your computer.
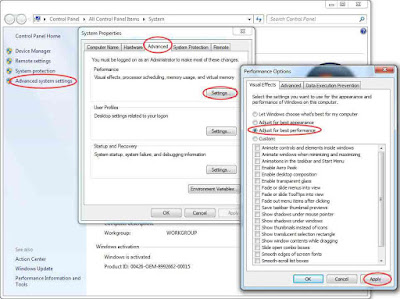
Method 3 : Adjust for Best Performance
1. Right click on This PC icon and select Properties.
2. Select Advanced System settings.
3. Go to the System properties.
4. Select Settings
5. Choose Adjust for best performance and Apply.
6. Click OK and Restart your computer.
Method 4 : Disable startup programs
There are a few applications that automatically start running form the moment you turn on your computer. The apps running in the background may hinder other applications from running smoothly. By preventing unnecessary applications from automatically running during booting, you can help save precious RAM space.
1. Right click on task bar and open Task Manager. And click More details button to expand it.
2. On Task Manager window, open Startup tab.
3. Look through the list of applications that can run at start-up automatically.
4. Right click on the applications you wish to disable.
5. Click Disable button to remove it from startup list.
Method 5 : Disable Windows services
Superfetch service is usually booted by default. This service is especially designed for traditional hard drive disk. It improves computer performance by only allowing the memory to load a fraction of the data needed to run common programs very quickly.
So, although it may cause high memory usage Windows 10, it shouldn't be disabled if the computer disk is hard drive disk. However, if the computer disk is SSD, this service should be disabled.
1. Press Windows Keys
 + R keys, and then type services.msc to open Services window.
2. Scroll down to select Superfetch.
3. Right click on it and select Stop to disable it.
4. Now check There is no more high memory usage.
Method 6 : Defragment hard drives
1. Press the Windows Key
 + R at the same time. Type dfrgui without the quotes in the run window and press Enter of the keyboard.
2. Select the hard drives that you wish to defragment, such as the C drive or the D drive.
3. Click Optimize and follow the instructions on the screen to finish the defragment process.
4. Restart your computer.
Method 7 : Chrome
At the same time, some computer users complain that Chrome occupies too much memory usage, which is usually caused by the tab page single process design of Chrome. So, when users open too much tab pages, Chrome eats a lot of memory.
Luckily, if it is Chrome who occupies too much memory, users can close prefetch feature or install One Tab extension to solve this problem.
1. Open Chrome and go to Settings. Scroll down to open advanced settings. Uncheck "Use a prediction service to help complete searches and URLs typed in the address bar” and "Use a prediction service to load pages more quickly".
2. One Tab extension can close all tabs and integrate them into one tab, which can release a huge amount of memory space


No comments:
Post a Comment