Don’t worry, this article introduces the easy methods to stop Windows 10 update completely.
Why I can’t stop Windows 10 auto update?
As indicated by Microsoft, for Home edition users, Windows updates will be pushed to the users’ computer and automatically installed. So if you’re using Windows 10 Home version, you can’t stop Windows 10 update.
With Windows 8.1 and 7, you can choose to update your Windows in the following four options:
1. Install updates automatically (Recommended)
2. Download Updates but choose when to install them
3. Check for updates but let me choose whether to download and install them
4. Never check for updates (Not Recommended)
However, in Windows 10, these options have been removed and you can disable Windows 10 update at all.
Completely uninstall Windows 10 Update Assistant
Sometimes you’ve tried the solutions below to stop Windows 10 update, but it fails to work in times. one of the possible reasons is that Windows 10 Update Assistant modifies the settings in your computer and Windows 10 auto update starts to work again.
If you have Windows 10 Update Assistant installed in your computer, you should uninstall it completely.
Note: if you don’t want to uninstall Windows 10 Update Assistant, you can disable it from Task Scheduler. Go to Task Scheduler >Task Scheduler Library > Microsoft > Windows > UpdateOrchestrator, then click Update Assistant in the right pane. Make sure to disable each trigger in Triggers tab.
1.Press the Windows key
 and R, type appwiz.cpl, and click OK.
2.Find the Windows 10 Update Assistant in the listed programs, and right click on it, then select Uninstall.
3.Confirm the delete.
4.Open File Explorer, and click This PC.
5.If the Windows Update Assistant is installed by default when you install your Windows OS, go to the file where your system is installed, normally it’s This PC > C drive > Windows > Windows10Upgrade, then delete the Windows10Upgrade folder.
If the Windows 10 Update Assistant is installed separately, you can go to the location where the Windows 10 Update Assistant is saved, and delete the installation folder. It’s normally named as Windows10Upgrade.
6.Go to This PC > Windows, delete the folders named UpdateAssistantV2 and UpdateAssistant.
After the full uninstallation of Windows 10 Update Assistant, restart your computer.
Then you can try the methods below to stop Windows 10 update and it should work.
Solution 1: Disable Windows Update service to stop Windows 10 update
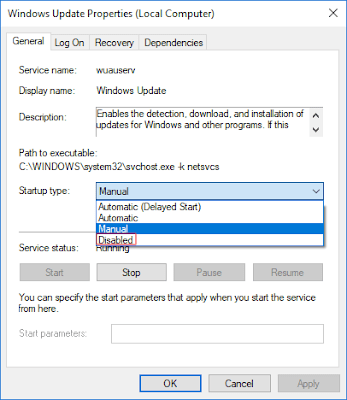
Windows Update service can detect, download and install the Windows updates and programs. Once disabled, you can not use the Windows automatic update feature, and programs will not be able to automatic download and install.
Some people find it impossible to disable Windows 10 update in the Windows Update service, and the settings changes every time your computer starts installing the Windows update. It’s likely caused by Windows 10 Update Assistant. If that’s your case, you should completely uninstall Windows 10 Update Assistant in your computer first.
Once uninstall Windows 10 Update Assistant, you can start the steps below:
1.Press the Windows key
 + R to invoke the Run box. Type services.msc and press Enter.
2.Scroll down to Windows Update, and double click it.
3.In Startup type, select Disabled. Then click Apply and OK to save the settings.
4.If it’s the first time that you stop the Windows Update service, you may also need to take one more step:
Still on the Windows Update Properties pane, click the Recovery tab, select Take No Action in the First failure section, then click Apply and OK to save the setting.
5.Restart your PC
Solution 2:Change the Setting of the Group Policy Editor
The Group Policy feature is not available in the Home edition. So, only when you run Windows 10 Professional, Enterprise, or Education, you can use the Group Policy Editor to change the settings to prevent Windows 10 from automatically updating. The group policy editor will notify you of new updates without automatically installing them.
1.Press the Windows key
 + R then type gpedit.msc and click OK.
2.Go to Computer Configuration > Administrative Templates > Windows Components > Windows Update.
3.Double-click Configure Automatic Updates.
4.Select Disabled in Configured Automatic Updates on the left, and click Apply and OK to disable the Windows automatic update feature.
Note: If you need to update your Windows version later, you can repeat the steps above, then select Enabled to turn on this feature, so that you can continue to download the updates.
Solution 3: Meter Your Network Connection
1.Click the Start button at the bottom left on your desktop, then click the Settings app.
2.Click Network & Internet.
3.Click WiFi in the left pane, then click the name of your Wi-Fi connection.
4.Click to turn on Set as metered connection.
Solution 4:Change Device Installation Settings to stop Windows 10 update
1.Type control panel in the search box, and click Control Panel.
2.Click System.
3.Click Advanced system settings on the left.
4.Click the Hardware tab, then click Device Installation Settings.
5.Select No (your device might not work as expected) and click Save changes.
6.Click OK to finish the settings. Then your device drivers will not automatically download from the manufacturers.
Video:


No comments:
Post a Comment