If you are getting the notification You've been signed in
with a temporary profile notification below while signing in to your Windows
10, 8.1, 7 account, it means that you are signed in using a temporary profile,
usually stored in C:\Users\TEMP. Any changes that the user makes to the
temporary profile are lost after signing in. Here is how to fix it.
Fix temporary profile login Error permanently
Get The SID
First of all you need to find the SID (Security
Identifier) of your user account. SID is actually experiencing the temporary
profile issue and displaying the notification. To find out the SID for your
user account,
1.Type cmd on Start menu search
2.Right click on command prompt and run as administrator
to open the command prompt.
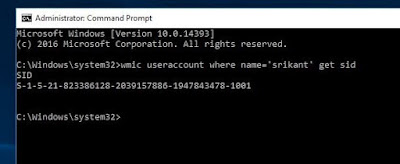
3.Then type the command below And hit the enter key to
get the SID. ( Note: Replace username with your current username ).
wmic useraccount where name=<‘user name’>get
sid
As Result, you will get the
S-1-5-21-823386128-2039157886-1947843478-1001
Note for your cause the SID will be different
Delete the profile from the Registry
After finding the SID, close the Command Prompt. Now we
begin to fix the registry settings.
2.Open the Registry Editor and go to:
HKEY_LOCAL_MACHINE\SOFTWARE\Microsoft\WindowsNT\CurrentVersion\ProfileList.
Here look your user account SID, you will find 2 registry
keys with same SID number one is normal and another is .bak . click on that SID
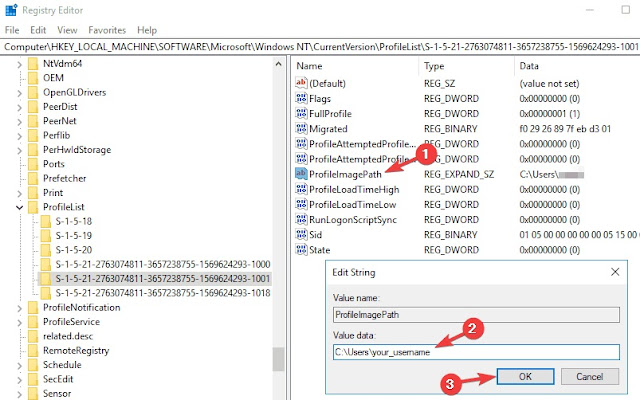
key (without .bak), you’ll see the “ProfileImagePath” entry in the right pane
that points to a temporary profile.
3.Double-click the ProfileImagePath entry to edit the
value data.
4.Type the correct profile path and click OK.
Note: If you don’t know the correct profile location,
open Windows Explorer browse to C: Drive Users open your user account folder.
copy the profile path.
5.Now on registry Window point ProfileImagePath Double
Click on it. Here change the profile path on value date field to C:\Users\your
user account name as shown bellow.
6.Next, right-click on your old SID key that is maked as
.bak, and then click on Delete.
7.Restart your computer
Video:
Video:


No comments:
Post a Comment